Archive for October, 2010

Z Biscuits

Sunday, October 31st, 2010 No comments

I just had to take the comment posted by Lise’ and turn it into a Post so that you don’t miss it.  For those of you asking for the perfect biscuit recipe after our experiement with biscuits post, here it is.

 Z Biscuits

Lise Shares the Z Biscuit Recipe

What do girls do when they are in the chemo infusion center? Talk food, read food, plan food. We came across Karin’s Biscuit blog and we thought, YEA! There is no one that I know of who does not have a biscuit memory or story. Watching my grandmother dip into her flour bin and scoop out heaps of flour onto the counter, mixing and kneading til just so and using a very old(at that time and that was 40 years ago) lemonade can to cut out her biscuits. And the smell…oh the smell of the biscuits baking and of course pulling them out of the oven steaming and barely letting them cool to pop a bit into your mouth, mmmmm. During her chemo infusion, Bill’s mom and I began to chat about such things. I raved about her biscuit recipe, not because she’s my mother-in-law, but because they are the best biscuits I have ever had. She passed her recipe off as “just like all the others”, but it’s not. She cuts in 4 TBSP of cold shortening and 5 TBSP of cold butter into the dry ingredients. After cutting the biscuits out, she dips the bottom of each biscuit into melted butter before placing on the baking sheet. Clearly, this is not a diet biscuit or the less guilty version, but yummy biscuits every time. These are special. If you get the chance, try this biscuit recipe from a dear little woman from Oklahoma, Carolyn.

Z Biscuits

Pre-heat oven to 425 degrees

*3 1/2 C. Flour
*1 TBSP plus 1 tsp Baking Powder
*1 tsp Salt
*4 TBSP Cold Shortening
*5 TBSP Cold Butter
*1-1 1/4 C. Milk or 1 1/2 -1 3/4 C. Buttermilk

Sift together dry ingredients in a medium bowl. Cut in, with 2 knives or a pastry cutter, Shortening and Butter. Continue to “cut” mixture for about 2 minutes until the dough looks like bread crumbs.Mix in 1 cup of Milk, if the mixture seems dry continue to gradually add the rest of the milk. Gather dough into a ball and place it on a floured surface to be rolled out. Using a floured biscuit cutter, glass or antique lemonade can, cut the biscuits out. Melt a 1/4 C. butter, I usually do this in a dish with a lip. Dip each biscuit in melted butter and place on baking sheet. Before placing the biscuits in the oven, brush the tops lightly with, you guessed it, melted butter. Bake for 12- 15 minutes in a pre-heated 425 degree oven, until lightly browned. Enjoy!

Great with Quince Jam!

Ciao – Lise

Share

Homemade Baklava – Not as complicated as you thought!

Friday, October 29th, 2010 1 comment

From the “Dinner in Athens” chapter of Cook the Part :

Next weekend we are planning to cook the “Dinner in Athens” chapter of my book with some of our biotech friends.  In preparation for that event, I am making the Baklava this weekend.  Baklava is always better when it can “rest” for a week before eating.  Before serving the Baklava, I put it into petit four cups.  Your friends will be so impressed that you made this from scratch!  We often make this before the holidays and include a few pieces with our Christmas cookie gift plates.
 Homemade Baklava   Not as complicated as you thought!

Baklava


Syrup:
1 cup honey
2 cups water
Zest of one lemon
2 cinnamon sticks
 
Filling:
4 cups nuts (walnuts or pecans)
1 cup sugar
3 teaspoons cinnamon
1 ½ teaspoons nutmeg

2 1 pound boxes filo dough
1 pound butter, melted

Prepare Syrup.
Add all syrup ingredients to saucepan and boil for 30 minutes.
img 29102010 160444 Homemade Baklava   Not as complicated as you thought!>

Diagram for scoring top of baklava

Prepare Filling.
Place all filling ingredients in bowl of food processor and process until mixture is well blended and nuts are finely chopped.

Assemble Baklava.
Using a large round pizza pan with a 1″ rim, place a layer of filo dough into bottom of pan.  Cover pan with dough and brush with melted butter. Continue until 8 layers have been assembled, with butter brushed between each layer.  Sprinkle with 1/2 cup of filling.  Add three layers of dough, brushing butter between each layer, followed by another 1/2 cup of the nut mixture.  Continue 8-10 times until pan is full, dough and nut mixture are used up.
Cut off overhang and finish off by creating a rim around the edge, folding inward and tucking in the dough to create an edge.
Score the top as shown in the diagram, creating triangles.

Bake the Baklava.
Bake at 300 degrees for 1 1/2 hours, covering with foil after the first hour.
Remove from oven and cool.
Finish.
Pour hot sauce over the cold baklava.  This will keep for weeks.
Cut all the way through and put the triangles into paper petit four cups for serving.


Share
Categories: Cooking Tips, Recipes
Tags: , ,

Appetizer for Thanksgiving: Crostini with Lump Crab and Red Bell Pepper Salad

Sunday, October 24th, 2010 No comments
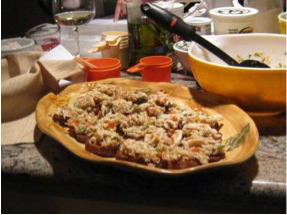
crostini with lump crab Appetizer for Thanksgiving: Crostini with Lump Crab and Red Bell Pepper Salad

Crostini with Lump Crab

Every year we strive to strike the right balance for Thanksgiving appetizers. We want complimentary flavors, not too filling, not too much additional work, something you might even delegate to someone else to bring. Here is an idea for something light, complimentary to the traditional meal and simple to make:

CROSTINI WITH LUMP CRAB AND RED BELL PEPPER SALAD
1 pound fresh lump crabmeat
½ cup extra virgin olive oil, plus more for drizzling
1 roasted red bell pepper, seeded and diced
1 tablespoon minced fresh chives
1 tablespoon finely chopped fresh basil
Juice and grated zest of 1 lemon
Salt and cracked black pepper
1 baguette, preferably one day old

Preheat oven to 425 degrees.

Pick through crabmeat and remove any shell pieces.  Transfer to medium sized bowl.
Combine olive oil, bell pepper, chives, basil, lemon juice and zest and mix well.
Season to taste with salt and pepper.
Slice baguette into ¼-inch slices.  Lay slices on a cookie sheet and drizzle with olive oil.
Bake in oven at 425 degrees for 10-12 minutes or until bread begins to brown.
Top crostinis with crab salad and arrange on serving platter.

Share

An Experiment with Biscuits

Thursday, October 21st, 2010 No comments
img00031 20101020 2100 300x225 An Experiment with Biscuits

Biscuits with good ol' lard

While visiting our friend, Rosalie, in Cleveland this week, we decided to make the homemade biscuits on the cover of the Jan 2008 Gourmet Magazine. Rosalie had been saving the magazine to try these beautiful biscuits that were made with lard, rather than the lesser evil counterparts. Looking for a really authentic flaky biscuit outcome, we embarked on the project with great anticipation. The other ingredients were standard fare – flour, baking powder, salt and buttermilk. To our great disappointment, while the biscuits were edible or even “good”, they were not the outstanding interpretation of biscuits that we were anticipating. Our advice is to stick with the vegetable shortening alternative and reduce the guilt factor when you are making your biscuits!

Share
Categories: Cooking Tips
Tags: ,